

The kettle's boiling, the counters are finally clear, and you're looking at that blank patch beside the cabinets again. It needs something personal, but not another shelf to dust or a collection of little signs competing with the coffee maker. Metal kitchen wall art can give that wall a farmhouse focal point, provided you choose it for the kitchen you cook in, not just the photograph you liked.
Table of Contents
- Why Metal Belongs Above the Work Zone
- Metal Types and Finishes Worth Buying
- Scale and Placement That Stay Out of the Heat
- Farmhouse Style With One Strong Piece
- How to Hang Metal Kitchen Art Securely
- Care That Keeps the Finish Looking New
Why Metal Belongs Above the Work Zone
Say your kitchen has cream cabinets, dark handles, and a breakfast wall that looks unfinished. A simple metal family sign could connect those details without taking up counter space. The important decision isn't whether to choose a tractor, a botanical shape, or a monogram. It's whether the piece belongs on that particular wall.
Metal already feels familiar in a working kitchen because it appears in pans, cabinet hardware, and utility fittings. That connection has a long history: the Victoria and Albert Museum's metalwork collection places everyday kitchen utensils within the same broad material tradition as decorative objects and architectural metalwork. A farmhouse sign draws on that practical character without needing to look like a salvaged farm tool.
Make the decisions in a useful order
Before shopping by motif, work through these choices:
- Match the material to the room. A humid kitchen needs a suitable finish, not merely a convincing rustic appearance.
- Size the usable opening. Look at the clear wall between obstacles rather than the dimensions of the whole room.
- Choose a sensible location. Keep decoration away from the areas that collect cooking residue.
- Plan the attachment. The wall construction and finished weight determine the hardware.
- Stop at a focal piece. Give the design enough empty space to be understood.
Decorating doesn't have to become another renovation. In 2023, 56% of U.S. homeowners undertook decorating projects, while 27% remodeled a kitchen, according to Houzz's 2024 study. A well-chosen sign can be a finishing decision after the disruptive work is done.
Styling test: If you need to move an everyday appliance to make the decoration work, choose another wall.
The wall finish deserves attention too. If you're repainting before hanging, NorCal Construction's guide to the best paint sheen for busy kitchens is useful context for choosing a cleanable background.
For the surrounding room, use these farmhouse kitchen decor ideas to coordinate existing finishes and textiles. Let the art complete that setting rather than start an unrelated theme.
Metal Types and Finishes Worth Buying
Powder-coated mild steel is a sensible starting point for an indoor farmhouse sign. It suits cut lettering and silhouettes, and an opaque finish makes the outline easy to read. But powder coating isn't a blanket guarantee against kitchen moisture.
A smooth front can hide poor preparation underneath. Manufacturing Processes' powder-coating guidance identifies pretreatment as a major factor in corrosion performance and describes a production process involving cleaning, pretreatment, curing, film-thickness measurement, and adhesion verification. For a buyer, the practical lesson is simple: judge the construction and coating coverage, not just the color.
Kitchen metals and finishes compared
| Material | Best kitchen use | Everyday care | Avoid |
|---|---|---|---|
| Powder-coated mild steel | Indoor walls; covered porches only with an exterior-suitable coating | Mild soap if approved, then dry at once | Abrasive pads and chlorine unless approved |
| Aluminum | Humid rooms and lighter hangs | Mild soap and a soft cloth, compatible with its finish | Treating it as a food-contact surface |
| Stainless steel | Decorative use near moisture, outside direct splash | Mild detergent, then dry | Assuming the artwork qualifies as a prep surface or backsplash |
| Galvanized steel | Dry display walls only | Dust; use minimal water | Food contact, acids, and trapped steam |
| Raw or rusted steel | Dry rooms away from cooking | Keep sealed and dry | Range, hood, and sink walls |
| Painted thin tin | Small renter accents | Gentle wipe compatible with the paint | Expecting it to hold heavy hardware |
Aluminum is worth considering when handling weight is your main concern. Stainless steel gives a cleaner, more contemporary appearance, although fingerprints and reflections may be more noticeable than on a matte painted finish. Neither material removes the need to check how the finished artwork should be cleaned.
Galvanized and deliberately rusted pieces need more restraint. Their weathered appearance can look right beside old wood, but a dry breakfast wall is a better setting than a steamy cooking corner. Rustic appearance and moisture resistance are different qualities.
Inspect the places the photograph hides
Look closely at cut edges, mounting holes, welds, and the back. Ask for a detail photograph if the listing shows only a styled front view. Bare edges, bubbling, flaking, or rusty marks around holes are reasons to pause.
Useful buying questions include:
- What is underneath the finish? Identify the actual metal rather than accepting a broad description such as metallic decor.
- What cleaning is permitted? Look for a clear answer about mild detergent and drying.
- Are the edges finished? Check both corrosion protection and whether exposed points could catch a cloth or hand.
- Is the intended setting stated? Indoor decoration and sheltered outdoor use aren't interchangeable specifications.
Motif can come after those checks. If your farmhouse style includes old trucks or workshop references, the car decor ideas from Volkswagen Memorabilia offer a useful way to compare vehicle-inspired silhouettes with more traditional agricultural imagery. Borrow the visual direction, then choose a construction suitable for your kitchen.
Scale and Placement That Stay Out of the Heat
Measure the usable wall width and height, then mark the boundaries created by cabinets, switches, outlets, and door swings. Don't count space you can't safely occupy. A broad wall can still have a surprisingly small usable opening once the pantry door is open.
There isn't a universal artwork size that fits every kitchen. Start with a paper shape, stand at the doorway, and judge whether it looks connected to the cabinet run or stranded between objects. If you can't read the lettering from the place where you'll normally see it, choose a simpler design rather than automatically going larger.
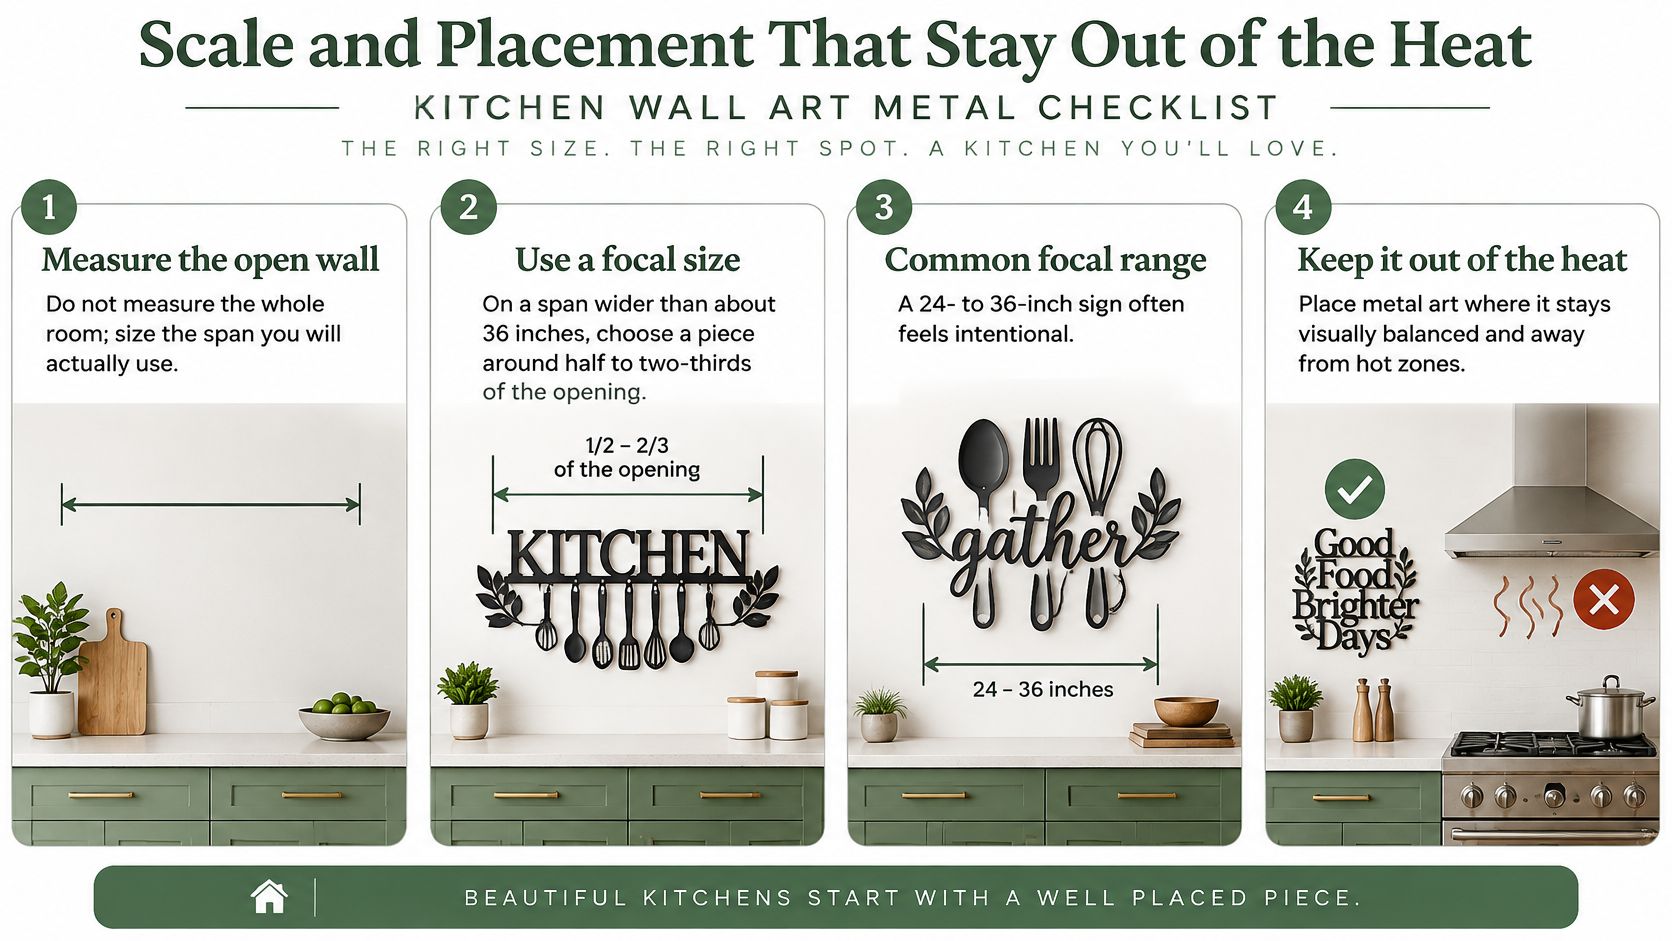
Treat sizing suggestions as styling starting points, not installation clearances. Appliance instructions and the actual exposure to heat, steam, and grease take priority over a balanced-looking arrangement.
Size and clearance by kitchen wall
| Wall | Suggested scale | Placement limit |
|---|---|---|
| Above the range or hood | Leave clear; choose an adjacent display wall instead | Outside radiant heat, exhaust, and grease |
| Backsplash between counters | Skip separate decorative art; use a purpose-designed backsplash surface | No decorative seams or gaps that trap soil |
| Broad open wall beside cabinets | A focal piece with generous visible wall around it | Clear of the full cabinet-door swing |
| Narrow galley or rental kitchen | A compact or vertical design | Clear of passing shoulders, door swings, and sightlines |
| Sink wall | Coordinate with the neighboring open wall | Beside the splash area, not directly over the faucet |
Decorative does not mean food-safe
The food-safety construction-materials guidance describes non-food-contact surfaces as needing durability, corrosion resistance, non-absorbency, and cleanability; it also identifies galvanized metal as unsuitable for food-contact surfaces. Those distinctions matter because a metal sign isn't automatically a food-safe surface just because it's made of metal.
Keep decorative panels away from direct food preparation and don't substitute them for a backsplash. Layered lettering, folded seams, and spacers can create places where grease collects and a cleaning cloth can't reach. If a location needs frequent scrubbing, choose a different location for the artwork.
A wall that stays clean only when you stop frying isn't a good display wall.
Beside the sink, watch where water lands during washing and draining. Around a dishwasher or kettle, check where steam travels when you open the door or lift the lid. These everyday observations are more useful than an arbitrary decorative clearance.
Finish with a full-size paper template. Open every neighboring cabinet and appliance, walk past carrying a tray, and check the view under both daylight and task lighting. Reflective copper or silver can produce glare, while an oversized dark silhouette may feel heavy in a narrow room.
Farmhouse Style With One Strong Piece
Personalization and a connection to nature don't require more objects. In KBB's reporting on the NKBA 2025 Kitchen Trends Report, 72% of surveyed industry respondents said homeowners wanted stronger connections to the outdoors, and 64% reported growing interest in kitchen herb and vegetable gardens. A botanical silhouette or agricultural motif can express that direction without adding another collection to the counter.
Choose a subject that belongs to the household. A tractor makes sense for a family with farming roots; a hen-house motif suits someone who keeps chickens. If the connection needs a long explanation, a family name or restrained monogram may be the better choice.

Choose meaning before adding accessories
For a concrete example, our Personalized Classic Tractor Metal Sign combines a classic tractor design with a family name and established date, using laser-cut mild steel and a powder-coated finish. That combination gives the wall a subject and a personal reference without requiring a cluster of supporting plaques.
With any personalized design, read the preview as finished lettering, not merely a spelling check. Look at the spacing around the surname, the balance of the date, and whether the words remain readable within the silhouette. Confirm punctuation and mounting provisions before placing the order.
These custom kitchen sign ideas can help you narrow the wording without filling the piece with competing messages.
The rest of the room should support the choice:
- Repeat an existing finish. A dark sign can relate to cabinet pulls without matching every metal object.
- Use textiles for softness. A plain runner or familiar rooster rug can provide warmth without adding more wall lettering.
- Keep the shelf useful. If there's a shelf below, leave room for the things you reach for.
- Respect the main view. In an open-plan kitchen, judge the piece from the dining table as well as the sink.
Know when the wall is finished
Open shelving already supplies outlines, labels, crockery, and changing daily detail. A neighboring sign should be quieter than the shelves, not another dense arrangement. You don't need greenery tucked around every edge to make a metal design feel farmhouse.
Editing rule: Remove the smallest competing accent before buying another coordinating one.
A meaningful focal piece gives the eye somewhere to settle. That's especially valuable in a working kitchen, where dish towels, produce, and utensils already bring plenty of color and movement.
How to Hang Metal Kitchen Art Securely
Start with the wall, not the hook you happen to have in a drawer. A sign can have strong hanging points and still fail if the fastener is wrong for the substrate. Drywall, plaster, masonry, and tiled walls need different installation decisions.
Gather a stud finder, pencil, tape measure, level, drill, suitable bits, and your paper template. Also examine the sign's attachment points before buying hardware. A cleat, keyhole slot, open mounting hole, and magnetic mounting system don't all connect to the wall in the same way.
Follow the wall-first sequence
The Colorado Art Services hanging guidance supports a conservative hardware target of at least twice the finished sign's weight; for a 20 lb sign, that means a target of at least 40 lb, preferably using two attachment points and direct stud fastening where possible.
- Weigh the complete assembly. Include the brackets, cleat, or other fittings that the wall will carry. Don't estimate weight from the sign's width or apparent thickness.
- Identify the substrate and locate studs. Check what's behind the visible finish. Tile is a surface covering, not proof of sound backing, and plaster shouldn't be treated automatically as drywall.
- Choose compatible hardware. Match the fastener to both the wall and the sign's mounting arrangement. Use the manufacturer's applicable working-load guidance, not a laboratory failure number printed without installation context.
- Mark the centerline and attachment positions. Level the template and confirm the design won't rotate into a cabinet or project into a walking route. Check for likely services before drilling.
- Predrill with the specified bit. The correct hole size is part of how the anchor works. An enlarged or ragged hole can undermine an otherwise suitable installation.
- Tighten until secure, not crushed. Stop before the drywall face compresses or a bracket bends. If the anchor spins or the hole breaks away, repair the installation rather than adding more torque.
- Hang, level, and inspect. Confirm that every attachment is fully engaged. Check that spacers sit properly and that the sign can't rock when lightly touched.
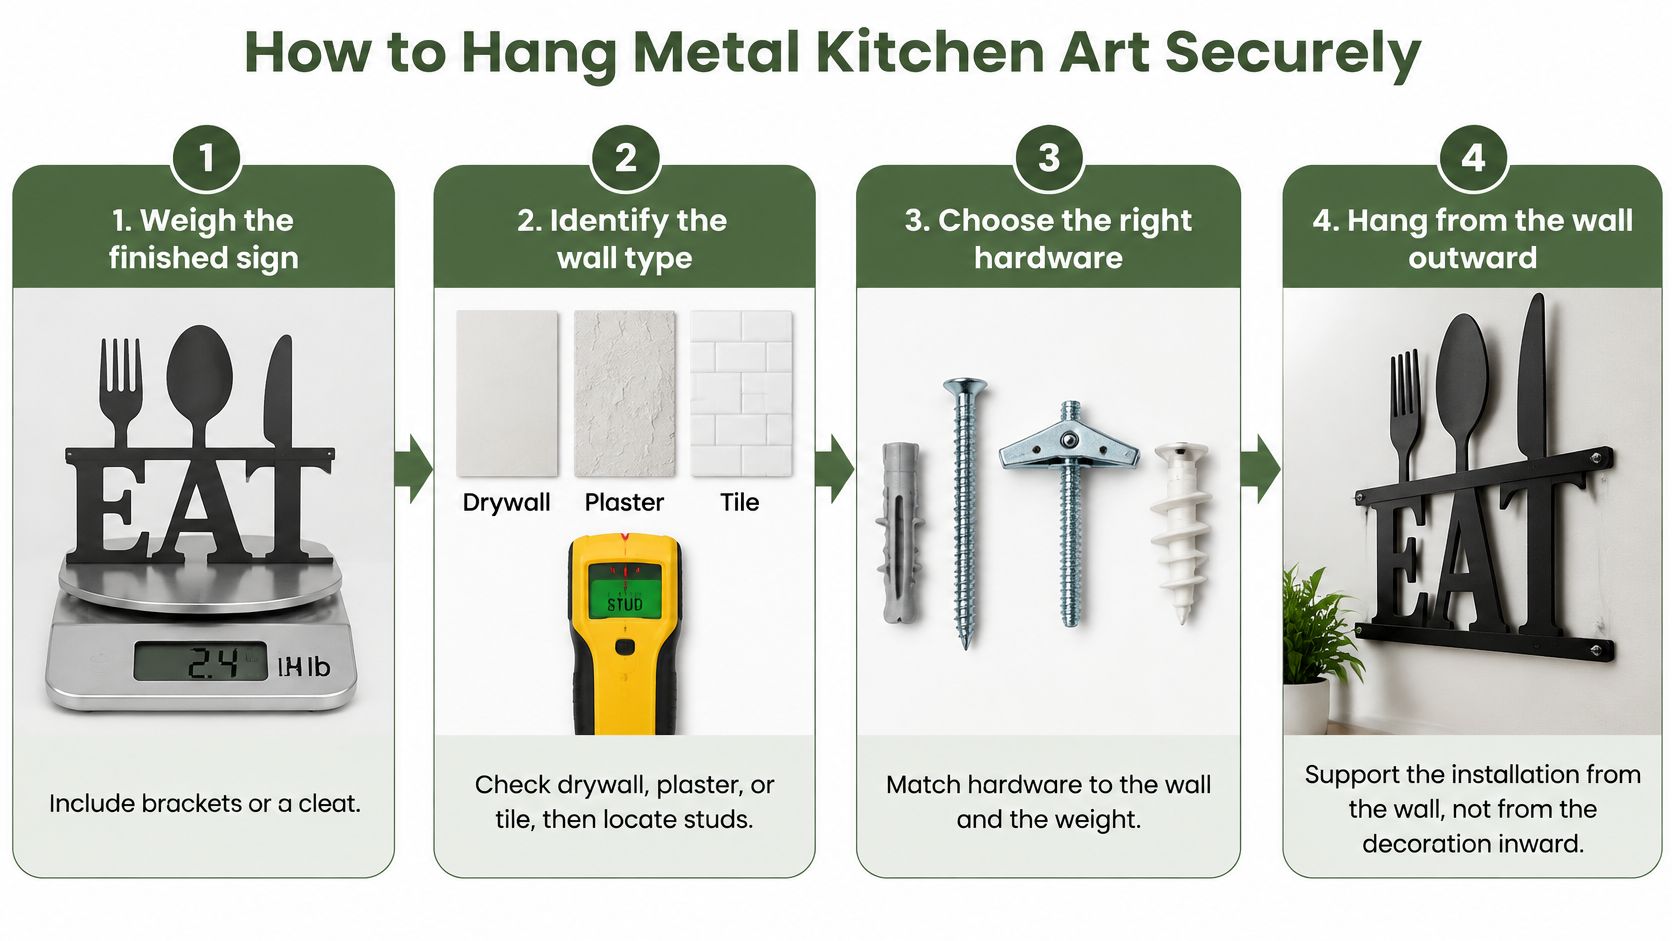
Hanging hardware and working loads
These are approximate guidance ranges, not guaranteed capacities or substitutes for the specific fastener instructions.
| Hardware | Approx. working load | Use when |
|---|---|---|
| Plastic expansion anchors | Light-duty range; verify the product's rated load | A light plaque in sound drywall, where the anchor is approved |
| Threaded drywall anchors | Product-specific; choose a conservative rated load | A medium sign when studs aren't accessible |
| Molly bolts | Verify the rating for the wall thickness | A heavier piece on suitable hollow-wall construction |
| Toggle bolts | Verify the rating and required cavity depth | A wide sign requiring hollow-wall support |
| Screws into wood studs | Select a rated assembly with the required safety margin | Sound wood framing is available behind the mounting points |
A wide sign hung from a single point can rotate and concentrate force around that attachment. Don't assume that adding another anchor automatically doubles capacity, either. Uneven loading, damaged walls, and projecting standoffs can change how the assembly behaves.
Renters should choose a lightweight piece if removable mounting is essential. Use adhesive systems only where their instructions approve the surface, weight, temperature, and humidity, and allow the specified bonding time. Heavy steel on glazed tile isn't a place to improvise with adhesive hooks.
For tile drilling or uncertain backing, a qualified installer is a better choice than an experimental hole beside the sink.
Care That Keeps the Finish Looking New
A useful cleaning routine is gentle enough to preserve the finish and thorough enough to remove cooking residue. Begin with the care instructions for the actual coating. Clean the finish you own, not the bare metal named underneath it.
Dust with a dry microfiber cloth before using anything damp. Pay attention to the upper edge, lettering bridges, and brackets, where residue can be less visible from the floor. Support delicate cut lettering rather than dragging a cloth across it.
Clean without soaking
When the approved finish permits mild soap, dilute a small amount in warm water and dampen the cloth rather than spraying the sign. Wipe the face gently, remove soap residue with a separate lightly dampened cloth, and dry the piece. Don't flood mounting holes or allow water to collect behind layered details.
Use a routine based on what happens in your kitchen:
- After dusty work. Remove loose dust first so you don't rub grit across the coating.
- After greasy cooking. Check the top edge and nearby wall for a sticky film.
- When cleaning the back. Take the sign down safely if you can't reach it without twisting the mounting points.
- After reinstalling. Make sure every hanger is engaged and the piece sits as intended.
Don't scrub harder because a mark remains. A stubborn patch may be a coating defect, corrosion, or a stain that needs a finish-specific treatment. Test any approved cleaner discreetly before treating the visible face.
Decide whether to clean, repair, or remove
An intact surface with removable dirt needs cleaning. A chip exposing bare metal needs attention before moisture reaches the surrounding coating. Blistering, lifting film, or rust spreading underneath the finish calls for taking the piece down and assessing repair or replacement.
For a damaged steel piece, these instructions on how to protect metal from rust provide useful context for choosing a repair approach. Don't cover active corrosion with an unrelated craft paint and assume the problem is solved.
Check the mounting while the sign is down. Look for loose screws, distorted brackets, rust around holes, or wall damage, and investigate movement rather than repeatedly tightening the same failing connection.
For a sheltered porch piece visible from the kitchen, follow its outdoor-care instructions instead of assuming rain will clean it. Keep drainage paths clear and let the back dry before rehanging. Care can preserve a decorative finish, but it can't turn artwork into a food-contact surface.
Farmhouse World offers custom metal signs, rustic home accents, and personalized gifts for a kitchen that feels like yours. Visit Farmhouse World with your wall measurements, preferred motif, and finish requirements in hand, then choose a focal piece you can hang securely outside the cooking mess.


